Veeam & Proxmox VE
Veeam has made a strategic move by integrating the open-source virtualization solution Proxmox VE (Virtual Environment) into its portfolio. Signaling its commitment into the evolving needs of the open-source community and the open-source virtualization market, this integration positions Veeam as a forward-thinking player in the industry, ready to support the rising tide of open-source solutions. The combination of Veeam’s data protection solutions with the flexibility of Proxmox VE’s platform offers enterprises a compelling alternative that promises cost savings and enhanced data security.
With the Proxmox VE, now also one of the most important and often requested open-source solution and hypervisor is being natively supported – and it could definitely make a turn in the virtualization market!
Opportunities for Open-Source Virtualization
In many enterprises, a major hypervisor platform is already in place, accompanied by a robust backup solution – often Veeam. However, until recently, Veeam lacked direct support for Proxmox VE, leaving a gap for those who have embraced or are considering this open-source virtualization platform. The latest version of Veeam changes the game by introducing the capability to create and manage backups and restores directly within Proxmox VE environments, without the need for agents inside the VMs.
This advancement means that entire VMs can now be backed up and restored across any hypervisor, providing unparalleled flexibility. Moreover, enterprises can seamlessly integrate a new Proxmox VE-based cluster into their existing Veeam setup, managing everything from a single, central point. This integration simplifies operations, reduces complexity, and enhances the overall efficiency of data protection strategies in environments that include multiple hypervisors by simply having a one-fits-all solution in place.
Also, an heavily underestimated benefit, offers the possibilities to easily migrate, copy, backup and restore entire VMs even independent of their underlying hypervisor – also known as cross platform recovery. As a result, operators are now able to shift VMs from VMware ESXi nodes / vSphere, or Hyper-V to Proxmox VE nodes. This provides a great solution to introduce and evaluate a new virtualization platform without taking any risks. For organizations looking to unify their virtualization and backup infrastructure, this update offers a significant leap forward.
Integration into Veeam
Integrating a new Proxmox cluster into an existing Veeam setup is a testament to the simplicity and user-centric design of both systems. Those familiar with Veeam will find the process to be intuitive and minimally disruptive, allowing for a seamless extension of their virtualization environment. This ease of integration means that your new Proxmox VE cluster can be swiftly brought under the protective umbrella of Veeam’s robust backup and replication services.
Despite the general ease of the process, it’s important to recognize that unique configurations and specific environments may present their own set of challenges. These corner cases, while not common, are worth noting as they can require special attention to ensure a smooth integration. Rest assured, however, that these are merely nuances in an otherwise straightforward procedure, and with a little extra care, even these can be managed effectively.
Overview
Starting with version 12.2, the Proxmox VE support is enabled and integrated by a plugin which gets installed on the Veeam Backup server. Veeam Backup for Proxmox incorporates a distributed architecture that necessitates the deployment of worker nodes. These nodes function analogously to data movers, facilitating the transfer of virtual machine payloads from the Proxmox VE hosts to the designated Backup Repository. The workers operate on a Linux platform and are seamlessly instantiated via the Veeam Backup Server console. Their role is critical and akin to that of proxy components in analogous systems such as AHV or VMware backup solutions.
Such a worker is needed at least once in a cluster. For improved performance, one worker for each Proxmox VE node might be considered. Each worker requires 6 vCPU, 6 GB memory and 100 GB disk space which should be kept in mind.
Requirements
This blog post assumes that an already present installation of Veeam Backup & Replication in version 12.2 or later is already in place and fully configured for another environment such like VMware. It also assumes that the Proxmox VE cluster is already present and a credential with the needed roles to perform the backup/restore actions is given.
Configuration
The integration and configuration of a Proxmox VE cluster can be fully done within the Veeam Backup & Replication Console application and does not require any additional commands on any cli to be executed. The previously mentioned worker nodes can be installed fully automated.
Adding a Proxmox Server

Virtual Infrastructure -> Add Server
This procedure is consistent with the established protocol for incorporating nodes from other virtualization platforms that are compatible with Veeam.
Afterwards, Veeam shows you a selection of possible and supported Hypervisors:
- VM vSphere
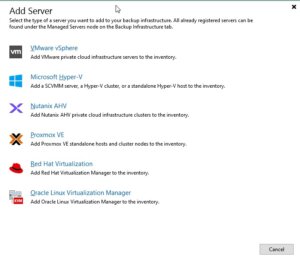

- Microsoft Hyper-V
- Nutanix AHV
- RedHat Virtualization
- Oracle Virtualization Manager
- Proxmox VE

In this case we simply choose Proxmox VE and proceed the setup wizard.
During the next steps in the setup wizard, the authentication details, the hostname or IP address of the target Proxmox VE server and also a snapshot storage of the Proxmox VE server must be defined.
Hint: When it comes to the authentication details, take care to use functional credentials for the SSH service on the Proxmox VE server. If you usually use the root@pam credentials for the web interface, you simply need to prompt root to Veeam. Veeam will initiate a connection to the system over the ssh protocol.

Usage

As a result, this does not only simplify the operator’s work when working with different servers and clusters but also provides finally the opportunity for cross-hypervisor-recoveries.
Creating Backup Jobs
Creating a new backup job for a single VM or even multiple VMs in a Proxmox environment is as simple and exactly the same way, like you already know for other hypervisors. However, let us have a quick summary about the needed tasks:
Open the Veeam Backup & Replication console on your backup server or management workstation. To start creating a backup job, navigate to the Home tab and click on Backup Job, then select Virtual machine from the drop-down menu.
When the New Backup Job wizard opens, you will need to enter a name and a description for the backup job. Click Next to proceed to the next step. Now, you will need to select the VMs that you want to back up. Click Add in the Virtual Machines step and choose the individual VMs or containers like folders, clusters, or entire hosts that you want to include in the backup. Once you have made your selection, click Next.

If you have configured multiple backup proxies, the next step allows you to specify which one to use. If you are not sure or if you prefer, you can let Veeam Backup & Replication automatically select the best proxy for the job. Click Next after making your choice.

Review all the settings on the summary page to ensure they are correct. If everything looks good, click Finish to create the backup job.

If you want to run the backup job immediately for ensuring everything works as expected, you can do so by right-clicking on the job and selecting Start. Alternatively, you can wait for the scheduled time to trigger the job automatically.
Restoring an entire VM
The restore and replication process for a full VM restore remains to the standard procedures. However, it now includes the significant feature of cross-hypervisor restore. This functionality allows for the migration of VMs between different hypervisor types without compatibility issues. For example, when introducing Proxmox VE into a corporate setting, operators can effortlessly migrate VMs from an existing hypervisor to the Proxmox VE cluster. Should any issues arise during the testing phase, the process also supports the reverse migration back to the original hypervisor. Let us have a look at the details.
Open the Veeam Backup & Replication console on your backup server or management workstation. To start creating a backup job, navigate to the Home tab and click on Backup Job, then select Virtual machine from the Disk menu.
Choose the Entire VM restore option, which will launch the wizard for restoring a full virtual machine. The first step in the wizard will ask you to select a backup from which you want to restore. You will see a list of available backups; select the one that contains the VM you wish to restore and proceed to the next step by clicking Next.
Now, you must decide on the restore point. Typically, this will be the most recent backup, but you may choose an earlier point if necessary. After selecting the restore point, continue to the next step.

In the next step, you will have options regarding the power state of the VM after the restoration. You can choose to power on the VM automatically or leave it turned off, depending on your needs.

The restoration process will begin, and its progress can be monitored within the Veeam Backup & Replication console. Depending on the size of the VM and the performance of your backup storage and network, the restoration can take some time.
File-Level-Restore
Open the Veeam Backup & Replication console on your backup server or management workstation. To start creating a backup job, navigate to the Home tab and click on Backup Job, then select Virtual machine from the Disk menu.

Choose the restore point that you want to use for the file-level restore. This is typically the most recent backup, but you can select an earlier one if needed. After picking the restore point, click Next to continue.
At this stage, you may need to choose the operating system of the VM that you are restoring files from. This is particularly important if the backup is of a different OS than the one on the Veeam Backup & Replication server because it will determine the type of helper appliance required for the restore.

Once the helper appliance is ready, you will be able to browse the file system of the backup. Navigate through the backup to locate the files or folders you wish to restore.
After selecting the files or folders for restoration, you will be prompted to choose the destination where you want to restore the data. You can restore to the original location or specify a new location, depending on your requirements.

The file-level restore process will start, and you can monitor the progress within the Veeam Backup & Replication console. The time it takes to complete the restore will depend on the size and number of files being restored, as well as the performance of your backup storage and network.
Conclusion
Summarising all the things, the latest update to Veeam introduces a very important and welcomed integration with Proxmox VE, filling a significant gap for enterprises that have adopted this open-source virtualization platform. By enabling direct backups and restores of entire VMs across different hypervisors without the need for in-VM agents, Veeam now offers unparalleled flexibility and simplicity in managing mixed environments. This advancement not only streamlines operations and enhances data protection strategies but also empowers organizations to easily migrate and evaluate new open-source virtualization platforms like Proxmox VE with minimal risk. It is great to see that more and more companies are putting efforts into supporting open-source solutions which underlines the ongoing importance of open-source based products in enterprises.
Additionally, for those starting fresh with Proxmox, the Proxmox Backup Server remains a viable open-source alternative and you can find our blog post about configuring the Proxmox Backup Server right here. Overall, this update represents a significant step forward in unifying virtualization and backup infrastructures, offering both versatility and ease of integration.
We are always here to help and assist you with further consulting, planning, and integration needs. Whether you are exploring new virtualization platforms, optimizing your current infrastructure, or looking for expert guidance on your backup strategies, our team is dedicated to ensuring your success every step of the way. Do not hesitate to reach out to us for personalized support and tailored solutions to meet your unique requirements in virtualization- or backup environments.
Integrating Proxmox Backup Server into Proxmox Clusters
Proxmox Backup Server
In today’s digital landscape, where data reigns supreme, ensuring its security and integrity is paramount for businesses of all sizes. Enter Proxmox Backup Server, a robust solution poised to revolutionize data protection strategies with its unparalleled features and open-source nature.

At its core, Proxmox Backup Server is a comprehensive backup solution designed to safeguard critical data and applications effortlessly in virtualized environments based on Proxmox VE. Unlike traditional backup methods, Proxmox Backup Server offers a streamlined approach, simplifying the complexities associated with data backup and recovery.
One of the standout features of Proxmox Backup Server is its seamless integration with Proxmox Virtual Environment (PVE), creating a cohesive ecosystem for managing virtualized environments. This integration allows for efficient backup and restoration of Linux containers and virtual machines, ensuring minimal downtime and maximum productivity. Without the need of any backup clients on each container or virtual machine, this solution still offers the back up and restore the entire system but also single files directly from the filesystem.
Proxmox Backup Server provides a user friendly interface, making it accessible to both seasoned IT professionals and newcomers alike. With its intuitive design, users can easily configure backup tasks, monitor progress, and retrieve data with just a few clicks, eliminating the need for extensive training or technical expertise.
Data security is a top priority for businesses across industries and Proxmox Backup Server delivers on this front. Bundled with solutions like ZFS it also brings in all the enterprise filesystem features like encryption at rest, encryption at transition, checksums, snapshots, deduplication and compression but also integrating iSCSI or NFS storage from enterprise storage solutions like from NetApp can be used.
Another notable aspect of Proxmox Backup Server is its cost effectiveness. As an open-source solution, it eliminates the financial barriers (also in addition with the Proxmox VE solutions) associated with proprietary backup software.
Integrating Proxmox Backup Server into Proxmox Clusters
General
This guide expects you to have already at least one Proxmox VE system up and running and also a system where a basic installation of Proxmox Backup Server has been performed. Within this example, the Proxmox Backup Server is installed on a single disk, where the datastore gets attached to an additional block device holding the backups. Proxmox VE and Proxmox Backup Server instances must not be in the same network but must be reachable for each other. The integration requires administrative access to the datacenter of the Proxmox VE instance(s) and the Backup Server.
Prerequisites
- Proxmox VE (including the datacenter).
- Proxmox Backup Server (basic installation).
- Administrative access to all systems.
- Network reachability.
- Storage device holding the backups (in this case a dedicated block storage device).
Administration: Proxmox Backup Server
Like the Proxmox VE environment, the Proxmox Backup Server comes along with a very intuitive web frontend. Unlike the web frontend of Proxmox VE, which runs on tcp/8006, the Proxmox Backup Server can be reached on tcp/8007. Therefore, all next tasks will be done on https://<IP-PROXMOX-BACKUP-SERVER>:8007.
After logging in to the web frontend, the dashboard overview welcomes the user.
Adding Datastore / Managing Storage
The initial and major tasks relies in managing the storage and adding a usable datastore for the virtualization environment holding the backup data. Therefore, we switch to the Administration chapter and click on Storage / Disks. This provides an overview of the available Devices on the Proxmox Backup Server. 
By clicking on ZFS in the top menu bar, a ZFS trunk can be created as a datastore. Within this survey, a name, the raid level, compression and the devices to use must be defined. 
Ensure to check Add as Datastore option (default) will create the given name directly as a usable datastore. In our example this will be backup01.
Keep in mind, that this part is not needed when using a NFS share. Also do not use this in addition with hardware RAID controllers.
Adding User for Backup
In a next step, a dedicated user will be created that will be used for the datastore permissions and for the Proxmox VE instances for authentication and authorization. This allows even complex setups with different datastores, different users including different access levels (e.g., reading, writing, auditing,…) on different clusters and instances. To keep it simple for demonstrations, just a single user for everything will be used.

Adding Permission of User for Datastore
Mentioning already the possibility to create complex setups regarding authentication and authorization, the datastore must be linked to at least a single user that can access it. Therefore, we go back to the Datastore and select the previously created backup01 datastore. In the top menu bar, the permissions can be created and adjusted in the Permissions chapter. Initially, a new one will be created now. Within the following survey the datastore or path, the user and the role must be defined:

Path: /datastore/backup01
User: dc01cluster22backup01@pbs
Role: DatastoreAdmin
Propagate: True
To provide a short overview of the possible roles, this will be shortly mentioned without any further explanation:
- Admin
- Audit
- DatastoreAdmin
- DatastoreAudit
- DatastoreBackup
- DatastorePowerUser
- DatastoreReader
Administration: Proxmox VE
The integration of the backup datastore will be performed from the Proxmox VE instances via the Datacenter. As a result, the Proxmox VE web frontend will now be used for further administrative actions. The Proxmox VE web frontend runs on tcp/8006, Therefore, all next tasks will be done on https://<IP-PROXMOX-VE-SERVER>:8006.

Adding Storage

In the left menu we choose the active datacenter and select the Storage options. There, we can find all natively support storage options like (NFS, SMB/CIFS, iSCSI, ZFS, GlusterFS,…) of Proxmox and finally select the Proxmox Backup Server as a dedicated item.
Afterwards, the details for adding this datastore to the datacenter must be inserted. The following options need to be defined:

Server: <FQDN-OR-IP-OF-BACKUP-SERVER>
Username: dc01cluster22backup01@pbs
Password: <THE-PASSWORD-OF-THE-USER>
Enable: True
Datastore: backup01
Fingerprint: <SYSTEM-FINGERPRINT-OF-BACKUP-SERVER>

After adding this backup datastore to the datacenter, this can immediately be used for backup and the integration is finalized.
Conclusion
Proxmox provides with the Proxmox Backup Server an enterprise backup solution, for backing up Linux containers and virtual machines. Supporting features like incremental and fully deduplicated backups by using the benefits of different open-source solutions, in addition with strong encryption and data integrity this solution is a prove that open-source software can compete with closed-source enterprise software. Together with Proxmox VE, enterprise like virtualization environments can be created and managed without missing the typical enterprise feature set. Proxmox VE and the Proxmox Backup Server can also be used in addition to storage appliances from vendors like NetApp, by directly use iSCSI or NFS.
Providing this simple example, there are of course much more complex scenarios which can be created and also should be considered. We are happy to provide you more information and to assist you creating such setups. We also provide help for migrating from other products to Proxmox VE setups. Feel free to contact us at any time for more information.