Master Pulumi with AWS Infrastructure and Amazon FSx for NetApp
Mastering Cloud Infrastructure with Pulumi: Introduction
In today’s rapidly changing landscape of cloud computing, managing infrastructure as code (IaC) has become essential for developers and IT professionals. Pulumi, an open-source IaC tool, brings a fresh perspective to the table by enabling infrastructure management using popular programming languages like JavaScript, TypeScript, Python, Go, and C#. This approach offers a unique blend of flexibility and power, allowing developers to leverage their existing coding skills to build, deploy, and manage cloud infrastructure. In this post, we’ll explore the world of Pulumi and see how it pairs with Amazon FSx for NetApp ONTAP—a robust solution for scalable and efficient cloud storage.
Pulumi – The Theory
Why Pulumi?
Pulumi distinguishes itself among IaC tools for several compelling reasons:
- Use Familiar Programming Languages: Unlike traditional IaC tools that rely on domain-specific languages (DSLs), Pulumi allows you to use familiar programming languages. This means no need to learn new syntax, and you can incorporate sophisticated logic, conditionals, and loops directly in your infrastructure code.
- Seamless Integration with Development Workflows: Pulumi integrates effortlessly with existing development workflows and tools, making it a natural fit for modern software projects. Whether you’re managing a simple web app or a complex, multi-cloud architecture, Pulumi provides the flexibility to scale without sacrificing ease of use.
Challenges with Pulumi
Like any tool, Pulumi comes with its own set of challenges:
- Learning Curve: While Pulumi leverages general-purpose languages, developers need to be proficient in the language they choose, such as Python or TypeScript. This can be a hurdle for those unfamiliar with these languages.
- Growing Ecosystem: As a relatively new tool, Pulumi’s ecosystem is still expanding. It might not yet match the extensive plugin libraries of older IaC tools, but its vibrant and rapidly growing community is a promising sign of things to come.
State Management in Pulumi: Ensuring Consistency Across Deployments
Effective infrastructure management hinges on proper state handling. Pulumi excels in this area by tracking the state of your infrastructure, enabling it to manage resources efficiently. This capability ensures that Pulumi knows exactly what needs to be created, updated, or deleted during deployments. Pulumi offers several options for state storage:
- Local State: Stored directly on your local file system. This option is ideal for individual projects or simple setups.
- Remote State: By default, Pulumi stores state remotely on the Pulumi Service (a cloud-hosted platform provided by Pulumi), but it also allows you to configure storage on AWS S3, Azure Blob Storage, or Google Cloud Storage. This is particularly useful in team environments where collaboration is essential.
Managing state effectively is crucial for maintaining consistency across deployments, especially in scenarios where multiple team members are working on the same infrastructure.
Other IaC Tools: Comparing Pulumi to Traditional IaC Tools
When comparing Pulumi to other Infrastructure as Code (IaC) tools, several drawbacks of traditional approaches become evident:
- Domain-Specific Language (DSL) Limitations: Many IaC tools depend on DSLs, such as Terraform’s HCL, requiring users to learn a specialized language specific to the tool.
- YAML/JSON Constraints: Tools that rely on YAML or JSON can be both restrictive and verbose, complicating the management of more complex configurations.
- Steep Learning Curve: The necessity to master DSLs or particular configuration formats adds to the learning curve, especially for newcomers to IaC.
- Limited Logical Capabilities: DSLs often lack support for advanced logic constructs such as loops, conditionals, and reusability. This limitation can lead to repetitive code that is challenging to maintain.
- Narrow Ecosystem: Some IaC tools have a smaller ecosystem, offering fewer plugins, modules, and community-driven resources.
- Challenges with Code Reusability: The inability to reuse code across different projects or components can hinder efficiency and scalability in infrastructure management.
- Testing Complexity: Testing infrastructure configurations written in DSLs can be challenging, making it difficult to ensure the reliability and robustness of the infrastructure code.
Pulumi – In Practice
Introduction
In the this section, we’ll dive into a practical example to better understand Pulumi’s capabilities. We’ll also explore how to set up a project using Pulumi with AWS and automate it using GitHub Actions for CI/CD.
Prerequisites
Before diving into using Pulumi with AWS and automating your infrastructure management through GitHub Actions, ensure you have the following prerequisites in place:
- Pulumi CLI: Begin by installing the Pulumi CLI by following the official installation instructions. After installation, verify that Pulumi is correctly set up and accessible in your system’s PATH by running a quick version check.
- AWS CLI: Install the AWS CLI, which is essential for interacting with AWS services. Configure the AWS CLI with your AWS credentials to ensure you have access to the necessary AWS resources. Ensure your AWS account is equipped with the required permissions, especially for IAM, EC2, S3, and any other AWS services you plan to manage with Pulumi.
- AWS IAM User/Role for GitHub Actions: Create a dedicated IAM user or role in AWS specifically for use in your GitHub Actions workflows. This user or role should have permissions necessary to manage the resources in your Pulumi stack. Store the AWS_ACCESS_KEY_ID and AWS_SECRET_ACCESS_KEY securely as secrets in your GitHub repository.
- Pulumi Account: Set up a Pulumi account if you haven’t already. Generate a Pulumi access token and store it as a secret in your GitHub repository to facilitate secure automation.
- Python and Pip: Install Python (version 3.7 or higher is recommended) along with Pip, which are necessary for Pulumi’s Python SDK. Once Python is installed, proceed to install Pulumi’s Python SDK along with any required AWS packages to enable infrastructure management through Python.
- GitHub Account: Ensure you have an active GitHub account to host your code and manage your repository. Create a GitHub repository where you’ll store your Pulumi project and related automation workflows. Store critical secrets like AWS_ACCESS_KEY_ID, AWS_SECRET_ACCESS_KEY, and your Pulumi access token securely in the GitHub repository’s secrets section.
- GitHub Runners: Utilize GitHub-hosted runners to execute your GitHub Actions workflows, or set up self-hosted runners if your project requires them. Confirm that the runners have all necessary tools installed, including Pulumi, AWS CLI, Python, and any other dependencies your Pulumi project might need.
Project Structure
When working with Infrastructure as Code (IaC) using Pulumi, maintaining an organized project structure is essential. A clear and well-defined directory structure not only streamlines the development process but also improves collaboration and deployment efficiency. In this post, we’ll explore a typical directory structure for a Pulumi project and explain the significance of each component.
Overview of a Typical Pulumi Project Directory
A standard Pulumi project might be organized as follows:
/project-root
├── .github
│ └── workflows
│ └── workflow.yml # GitHub Actions workflow for CI/CD
├── __main__.py # Entry point for the Pulumi program
├── infra.py # Infrastructure code
├── pulumi.dev.yml # Pulumi configuration for the development environment
├── pulumi.prod.yml # Pulumi configuration for the production environment
├── pulumi.yml # Pulumi configuration (common or default settings)
├── requirements.txt # Python dependencies
└── test_infra.py # Tests for infrastructure code
NetApp FSx on AWS
Introduction
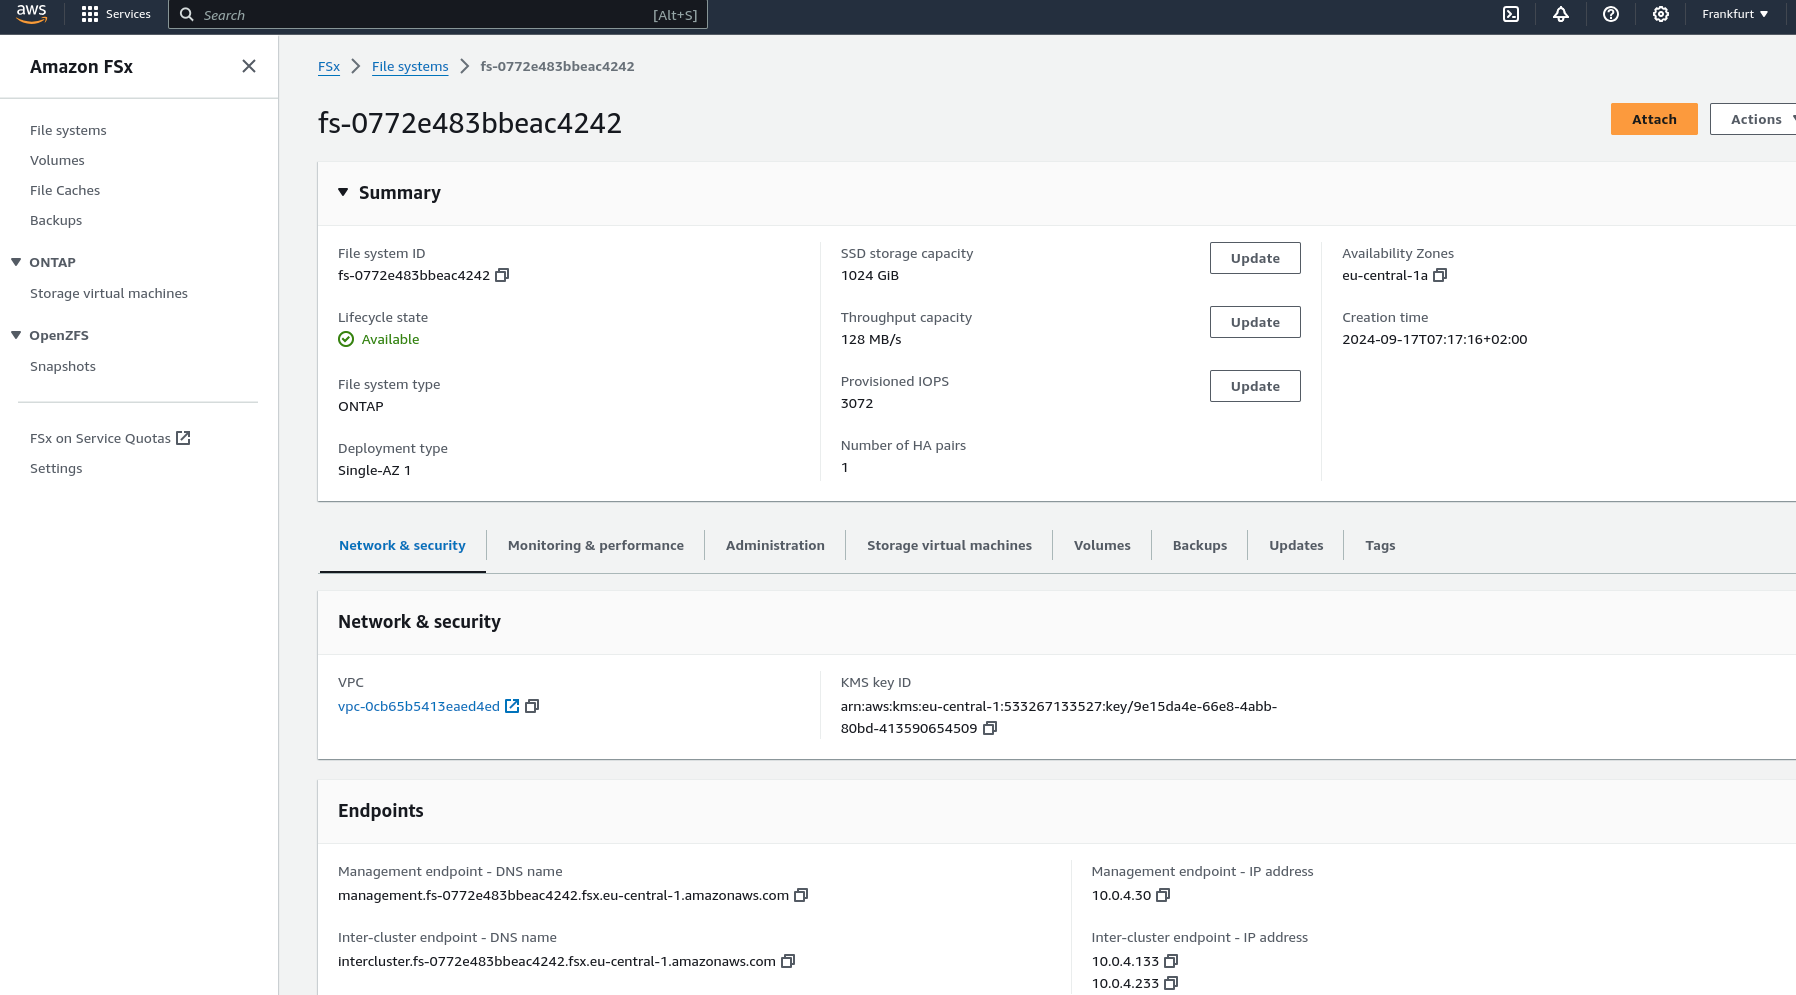
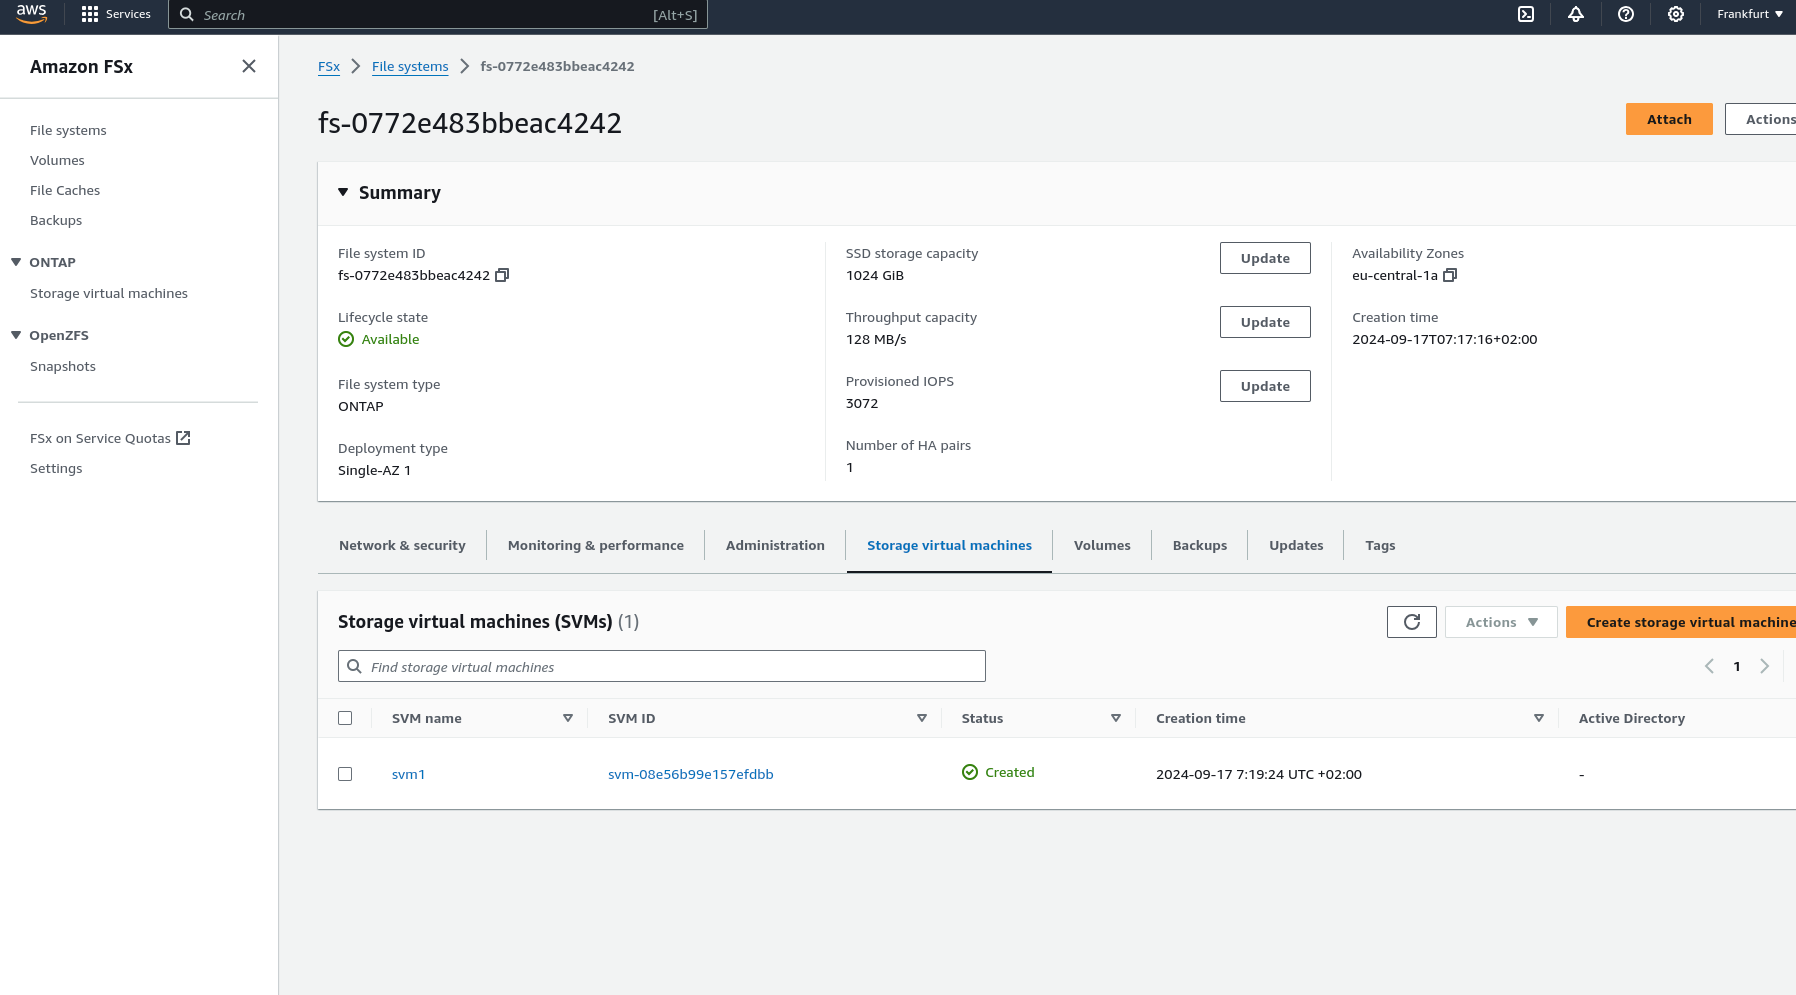
Amazon FSx for NetApp ONTAP offers a fully managed, scalable storage solution built on the NetApp ONTAP file system. It provides high-performance, highly available shared storage that seamlessly integrates with your AWS environment. Leveraging the advanced data management capabilities of ONTAP, FSx for NetApp ONTAP is ideal for applications needing robust storage features and compatibility with existing NetApp systems.
Key Features
- High Performance: FSx for ONTAP delivers low-latency storage designed to handle demanding, high-throughput workloads.
- Scalability: Capable of scaling to support petabytes of storage, making it suitable for both small and large-scale applications.
- Advanced Data Management: Leverages ONTAP’s comprehensive data management features, including snapshots, cloning, and disaster recovery.
- Multi-Protocol Access: Supports NFS and SMB protocols, providing flexible access options for a variety of clients.
- Cost-Effectiveness: Implements tiering policies to automatically move less frequently accessed data to lower-cost storage, helping optimize storage expenses.
What It’s About
In the next sections, we’ll walk through the specifics of setting up each component using Pulumi code, illustrating how to create a VPC, configure subnets, set up a security group, and deploy an FSx for NetApp ONTAP file system, all while leveraging the robust features provided by both Pulumi and AWS.
Architecture Overview
A visual representation of the architecture we’ll deploy using Pulumi: Single AZ Deployment with FSx and EC2

The diagram above illustrates the architecture for deploying an FSx for NetApp ONTAP file system within a single Availability Zone. The setup includes a VPC with public and private subnets, an Internet Gateway for outbound traffic, and a Security Group controlling access to the FSx file system and the EC2 instance. The EC2 instance is configured to mount the FSx volume using NFS, enabling seamless access to storage.
Setting up Pulumi
Follow these steps to set up Pulumi and integrate it with AWS:
Install Pulumi: Begin by installing Pulumi using the following command:
curl -fsSL https://get.pulumi.com | shInstall AWS CLI: If you haven’t installed it yet, install the AWS CLI to manage AWS services:
pip install awscliConfigure AWS CLI: Configure the AWS CLI with your credentials:
aws configureCreate a New Pulumi Project: Initialize a new Pulumi project with AWS and Python:
pulumi new aws-pythonConfigure Your Pulumi Stack: Set the AWS region for your Pulumi stack:
pulumi config set aws:region eu-central-1Deploy Your Stack: Deploy your infrastructure using Pulumi:
pulumi preview ; pulumi upExample: VPC, Subnets, and FSx for NetApp ONTAP
Let’s dive into an example Pulumi project that sets up a Virtual Private Cloud (VPC), subnets, a security group, an Amazon FSx for NetApp ONTAP file system, and an EC2 instance.
Pulumi Code Example: VPC, Subnets, and FSx for NetApp ONTAP
The first step is to define all the parameters required to set up the infrastructure. You can use the following example to configure these parameters as specified in the pulumi.dev.yaml file.
This pulumi.dev.yaml file contains configuration settings for a Pulumi project. It specifies various parameters for the deployment environment, including the AWS region, availability zones, and key name. It also defines CIDR blocks for subnets. These settings are used to configure and deploy cloud infrastructure resources in the specified AWS region.
config:
  aws:region: eu-central-1
  demo:availabilityZone: eu-central-1a
  demo:keyName: XYZ
  demo:subnet1CIDER: 10.0.3.0/24
  demo:subnet2CIDER: 10.0.4.0/24
The following code snippet should be placed in the infra.py file. It details the setup of the VPC, subnets, security group, and FSx for NetApp ONTAP file system. Each step in the code is explained through inline comments.
import pulumi
import pulumi_aws as aws
import pulumi_command as command
import os

# Retrieve configuration values from Pulumi configuration files
aws_config = pulumi.Config("aws")
region = aws_config.require("region")  # The AWS region where resources will be deployed

demo_config = pulumi.Config("demo")
availability_zone = demo_config.require("availabilityZone")  # Availability Zone for the deployment
subnet1_cidr = demo_config.require("subnet1CIDER")  # CIDR block for the public subnet
subnet2_cidr = demo_config.require("subnet2CIDER")  # CIDR block for the private subnet
key_name = demo_config.require("keyName")  # Name of the SSH key pair for EC2 instance access# Create a new VPC with DNS support enabled
vpc = aws.ec2.Vpc(
    "fsxVpc",
    cidr_block="10.0.0.0/16",  # VPC CIDR block
    enable_dns_support=True,    # Enable DNS support in the VPC
    enable_dns_hostnames=True   # Enable DNS hostnames in the VPC
)

# Create an Internet Gateway to allow internet access from the VPC
internet_gateway = aws.ec2.InternetGateway(
    "vpcInternetGateway",
    vpc_id=vpc.id  # Attach the Internet Gateway to the VPC
)

# Create a public route table for routing internet traffic via the Internet Gateway
public_route_table = aws.ec2.RouteTable(
    "publicRouteTable",
    vpc_id=vpc.id,
    routes=[aws.ec2.RouteTableRouteArgs(
        cidr_block="0.0.0.0/0",  # Route all traffic (0.0.0.0/0) to the Internet Gateway
        gateway_id=internet_gateway.id
    )]
)

# Create a single public subnet in the specified Availability Zone
public_subnet = aws.ec2.Subnet(
    "publicSubnet",
    vpc_id=vpc.id,
    cidr_block=subnet1_cidr,  # CIDR block for the public subnet
    availability_zone=availability_zone,  # The specified Availability Zone
    map_public_ip_on_launch=True  # Assign public IPs to instances launched in this subnet
)

# Create a single private subnet in the same Availability Zone
private_subnet = aws.ec2.Subnet(
    "privateSubnet",
    vpc_id=vpc.id,
    cidr_block=subnet2_cidr,  # CIDR block for the private subnet
    availability_zone=availability_zone  # The same Availability Zone
)

# Associate the public subnet with the public route table to enable internet access
public_route_table_association = aws.ec2.RouteTableAssociation(
    "publicRouteTableAssociation",
    subnet_id=public_subnet.id,
    route_table_id=public_route_table.id
)

# Create a security group to control inbound and outbound traffic for the FSx file system
security_group = aws.ec2.SecurityGroup(
    "fsxSecurityGroup",
    vpc_id=vpc.id,
    description="Allow NFS traffic",  # Description of the security group
    ingress=[
        aws.ec2.SecurityGroupIngressArgs(
            protocol="tcp",
            from_port=2049,  # NFS protocol port
            to_port=2049,
            cidr_blocks=["0.0.0.0/0"]  # Allow NFS traffic from anywhere
        ),
        aws.ec2.SecurityGroupIngressArgs(
            protocol="tcp",
            from_port=111,  # RPCBind port for NFS
            to_port=111,
            cidr_blocks=["0.0.0.0/0"]  # Allow RPCBind traffic from anywhere
        ),
        aws.ec2.SecurityGroupIngressArgs(
            protocol="udp",
            from_port=111,  # RPCBind port for NFS over UDP
            to_port=111,
            cidr_blocks=["0.0.0.0/0"]  # Allow RPCBind traffic over UDP from anywhere
        ),
        aws.ec2.SecurityGroupIngressArgs(
            protocol="tcp",
            from_port=22,  # SSH port for EC2 instance access
            to_port=22,
            cidr_blocks=["0.0.0.0/0"]  # Allow SSH traffic from anywhere
        )
    ],
    egress=[
        aws.ec2.SecurityGroupEgressArgs(
            protocol="-1",  # Allow all outbound traffic
            from_port=0,
            to_port=0,
            cidr_blocks=["0.0.0.0/0"]  # Allow all outbound traffic to anywhere
        )
    ]
)

# Create the FSx for NetApp ONTAP file system in the private subnet
file_system = aws.fsx.OntapFileSystem(
    "fsxFileSystem",
    subnet_ids=[private_subnet.id],  # Deploy the FSx file system in the private subnet
    preferred_subnet_id=private_subnet.id,  # Preferred subnet for the FSx file system
    security_group_ids=[security_group.id],  # Attach the security group to the FSx file system
    deployment_type="SINGLE_AZ_1",  # Single Availability Zone deployment
    throughput_capacity=128,  # Throughput capacity in MB/s
    storage_capacity=1024  # Storage capacity in GB
)

# Create a Storage Virtual Machine (SVM) within the FSx file system
storage_virtual_machine = aws.fsx.OntapStorageVirtualMachine(
    "storageVirtualMachine",
    file_system_id=file_system.id,  # Associate the SVM with the FSx file system
    name="svm1",  # Name of the SVM
    root_volume_security_style="UNIX"  # Security style for the root volume
)

# Create a volume within the Storage Virtual Machine (SVM)
volume = aws.fsx.OntapVolume(
    "fsxVolume",
    storage_virtual_machine_id=storage_virtual_machine.id,  # Associate the volume with the SVM
    name="vol1",  # Name of the volume
    junction_path="/vol1",  # Junction path for mounting
    size_in_megabytes=10240,  # Size of the volume in MB
    storage_efficiency_enabled=True,  # Enable storage efficiency features
    tiering_policy=aws.fsx.OntapVolumeTieringPolicyArgs(
        name="SNAPSHOT_ONLY"  # Tiering policy for the volume
    ),
    security_style="UNIX"  # Security style for the volume
)

# Extract the DNS name from the list of SVM endpoints
dns_name = storage_virtual_machine.endpoints.apply(lambda e: e[0]['nfs'][0]['dns_name'])

# Get the latest Amazon Linux 2 AMI for the EC2 instance
ami = aws.ec2.get_ami(
    most_recent=True,
    owners=["amazon"],
    filters=[{"name": "name", "values": ["amzn2-ami-hvm-*-x86_64-gp2"]}]  # Filter for Amazon Linux 2 AMI
)

# Create an EC2 instance in the public subnet
ec2_instance = aws.ec2.Instance(
    "fsxEc2Instance",
    instance_type="t3.micro",  # Instance type for the EC2 instance
    vpc_security_group_ids=[security_group.id],  # Attach the security group to the EC2 instance
    subnet_id=public_subnet.id,  # Deploy the EC2 instance in the public subnet
    ami=ami.id,  # Use the latest Amazon Linux 2 AMI
    key_name=key_name,  # SSH key pair for accessing the EC2 instance
    tags={"Name": "FSx EC2 Instance"}  # Tag for the EC2 instance
)

# User data script to install NFS client and mount the FSx volume on the EC2 instance
user_data_script = dns_name.apply(lambda dns: f"""#!/bin/bash
sudo yum update -y
sudo yum install -y nfs-utils
sudo mkdir -p /mnt/fsx
if ! mountpoint -q /mnt/fsx; then
sudo mount -t nfs {dns}:/vol1 /mnt/fsx
fi
""")

# Retrieve the private key for SSH access from environment variables while running with Github Actions
private_key_content = os.getenv("PRIVATE_KEY")
print(private_key_content)

# Ensure the FSx file system is available before executing the script on the EC2 instance
pulumi.Output.all(file_system.id, ec2_instance.public_ip).apply(lambda args: command.remote.Command(
    "mountFsxFileSystem",
    connection=command.remote.ConnectionArgs(
        host=args[1],
        user="ec2-user",
        private_key=private_key_content
    ),
    create=user_data_script,
    opts=pulumi.ResourceOptions(depends_on=[volume])
))
Pytest with Pulumi
# Importing necessary libraries
import pulumi
import pulumi_aws as aws
from typing import Any, Dict, List

# Setting up configuration values for AWS region and various parameters
pulumi.runtime.set_config('aws:region', 'eu-central-1')
pulumi.runtime.set_config('demo:availabilityZone1', 'eu-central-1a')
pulumi.runtime.set_config('demo:availabilityZone2', 'eu-central-1b')
pulumi.runtime.set_config('demo:subnet1CIDER', '10.0.3.0/24')
pulumi.runtime.set_config('demo:subnet2CIDER', '10.0.4.0/24')
pulumi.runtime.set_config('demo:keyName', 'XYZ') - Change based on your own key

# Creating a class MyMocks to mock Pulumi's resources for testing
class MyMocks(pulumi.runtime.Mocks):
    def new_resource(self, args: pulumi.runtime.MockResourceArgs) -> List[Any]:
        # Initialize outputs with the resource's inputs
        outputs = args.inputs

        # Mocking specific resources based on their type
        if args.typ == "aws:ec2/instance:Instance":
            # Mocking an EC2 instance with some default values
            outputs = {
                **args.inputs,  # Start with the given inputs
                "ami": "ami-0eb1f3cdeeb8eed2a",  # Mock AMI ID
                "availability_zone": "eu-central-1a",  # Mock availability zone
                "publicIp": "203.0.113.12",  # Mock public IP
                "publicDns": "ec2-203-0-113-12.compute-1.amazonaws.com",  # Mock public DNS
                "user_data": "mock user data script",  # Mock user data
                "tags": {"Name": "test"}  # Mock tags
            }
        elif args.typ == "aws:ec2/securityGroup:SecurityGroup":
            # Mocking a Security Group with default ingress rules
            outputs = {
                **args.inputs,
                "ingress": [
                    {"from_port": 80, "cidr_blocks": ["0.0.0.0/0"]},  # Allow HTTP traffic from anywhere
                    {"from_port": 22, "cidr_blocks": ["192.168.0.0/16"]}  # Allow SSH traffic from a specific CIDR block
                ]
            }

        # Returning a mocked resource ID and the output values
        return [args.name + '_id', outputs]

    def call(self, args: pulumi.runtime.MockCallArgs) -> Dict[str, Any]:
        # Mocking a call to get an AMI
        if args.token == "aws:ec2/getAmi:getAmi":
            return {
                "architecture": "x86_64",  # Mock architecture
                "id": "ami-0eb1f3cdeeb8eed2a",  # Mock AMI ID
            }

        # Return an empty dictionary if no specific mock is needed
        return {}

# Setting the custom mocks for Pulumi
pulumi.runtime.set_mocks(MyMocks())

# Import the infrastructure to be tested
import infra

# Define a test function to validate the AMI ID of the EC2 instance
@pulumi.runtime.test
def test_instance_ami():
    def check_ami(ami_id: str) -> None:
        print(f"AMI ID received: {ami_id}")
        # Assertion to ensure the AMI ID is the expected one
        assert ami_id == "ami-0eb1f3cdeeb8eed2a", 'EC2 instance must have the correct AMI ID'

    # Running the test to check the AMI ID
    pulumi.runtime.run_in_stack(lambda: infra.ec2_instance.ami.apply(check_ami))

# Define a test function to validate the availability zone of the EC2 instance
@pulumi.runtime.test
def test_instance_az():
    def check_az(availability_zone: str) -> None:
        print(f"Availability Zone received: {availability_zone}")
        # Assertion to ensure the instance is in the correct availability zone
        assert availability_zone == "eu-central-1a", 'EC2 instance must be in the correct availability zone'

    # Running the test to check the availability zone
    pulumi.runtime.run_in_stack(lambda: infra.ec2_instance.availability_zone.apply(check_az))

# Define a test function to validate the tags of the EC2 instance
@pulumi.runtime.test
def test_instance_tags():
    def check_tags(tags: Dict[str, Any]) -> None:
        print(f"Tags received: {tags}")
        # Assertions to ensure the instance has tags and a 'Name' tag
        assert tags, 'EC2 instance must have tags'
        assert 'Name' in tags, 'EC2 instance must have a Name tag'

    # Running the test to check the tags
    pulumi.runtime.run_in_stack(lambda: infra.ec2_instance.tags.apply(check_tags))

# Define a test function to validate the user data script of the EC2 instance
@pulumi.runtime.test
def test_instance_userdata():
    def check_user_data(user_data_script: str) -> None:
        print(f"User data received: {user_data_script}")
        # Assertion to ensure the instance has user data configured
        assert user_data_script is not None, 'EC2 instance must have user_data_script configured'

    # Running the test to check the user data script
    pulumi.runtime.run_in_stack(lambda: infra.ec2_instance.user_data.apply(check_user_data))
Github Actions
Introduction
GitHub Actions is a powerful automation tool integrated within GitHub, enabling developers to automate their workflows, including testing, building, and deploying code. Pulumi, on the other hand, is an Infrastructure as Code (IaC) tool that allows you to manage cloud resources using familiar programming languages. In this post, we’ll explore why you should use GitHub Actions and its specific purpose when combined with Pulumi.
Why Use GitHub Actions and Its Importance
GitHub Actions is a powerful tool for automating workflows within your GitHub repository, offering several key benefits, especially when combined with Pulumi:
- Integrated CI/CD: GitHub Actions seamlessly integrates Continuous Integration and Continuous Deployment (CI/CD) directly into your GitHub repository. This automation enhances consistency in testing, building, and deploying code, reducing the risk of manual errors.
- Custom Workflows: It allows you to create custom workflows for different stages of your software development lifecycle, such as code linting, running unit tests, or managing complex deployment processes. This flexibility ensures your automation aligns with your specific needs.
- Event-Driven Automation: You can trigger GitHub Actions with events like pushes, pull requests, or issue creation. This event-driven approach ensures that tasks are automated precisely when needed, streamlining your workflow.
- Reusable Code: GitHub Actions supports reusable “actions” that can be shared across multiple workflows or repositories. This promotes code reuse and maintains consistency in automation processes.
- Built-in Marketplace: The GitHub Marketplace offers a wide range of pre-built actions from the community, making it easy to integrate third-party services or implement common tasks without writing custom code.
- Enhanced Collaboration: By using GitHub’s pull request and review workflows, teams can discuss and approve changes before deployment. This process reduces risks and improves collaboration on infrastructure changes.
- Automated Deployment: GitHub Actions automates the deployment of infrastructure code, using Pulumi to apply changes. This automation reduces the risk of manual errors and ensures a consistent deployment process.
- Testing: Running tests before deploying with GitHub Actions helps confirm that your infrastructure code works correctly, catching potential issues early and ensuring stability.
- Configuration Management: It manages and sets up necessary configurations for Pulumi and AWS, ensuring your environment is correctly configured for deployments.
- Preview and Apply Changes: GitHub Actions allows you to preview changes before applying them, helping you understand the impact of modifications and minimizing the risk of unintended changes.
- Cleanup: You can optionally destroy the stack after testing or deployment, helping control costs and maintain a clean environment.
Execution
To execute the GitHub Actions workflow:
- Placement: Save the workflow YAML file in your repository’s .github/workflows directory. This setup ensures that GitHub Actions will automatically detect and execute the workflow whenever there’s a push to the main branch of your repository.
- Workflow Actions: The workflow file performs several critical actions:
- Environment Setup: Configures the necessary environment for running the workflow.
- Dependency Installation: Installs the required dependencies, including Pulumi CLI and other Python packages.
- Testing: Runs your tests to verify that your infrastructure code functions as expected.
- Preview and Apply Changes: Uses Pulumi to preview and apply any changes to your infrastructure.
- Cleanup: Optionally destroys the stack after tests or deployment to manage costs and maintain a clean environment.
By incorporating this workflow, you ensure that your Pulumi infrastructure is continuously integrated and deployed with proper validation, significantly improving the reliability and efficiency of your infrastructure management process.
Example: Deploy infrastructure with Pulumi
name: Pulumi Deployment
on:
push:
branches:
- main
env:
# Environment variables for AWS credentials and private key.
AWS_ACCESS_KEY_ID: ${{ secrets.AWS_ACCESS_KEY_ID }}
AWS_SECRET_ACCESS_KEY: ${{ secrets.AWS_SECRET_ACCESS_KEY }}
AWS_DEFAULT_REGION: ${{ secrets.AWS_DEFAULT_REGION }}
PRIVATE_KEY: ${{ secrets.PRIVATE_KEY }}
jobs:
pulumi-deploy:
runs-on: ubuntu-latest
environment: dev
steps:
- name: Checkout code
uses: actions/checkout@v3
# Check out the repository code to the runner.
- name: Configure AWS credentials
uses: aws-actions/configure-aws-credentials@v3
with:
aws-access-key-id: ${{ secrets.AWS_ACCESS_KEY_ID }}
aws-secret-access-key: ${{ secrets.AWS_SECRET_ACCESS_KEY }}
aws-region: eu-central-1
# Set up AWS credentials for use in subsequent actions.
- name: Set up SSH key
run: |
mkdir -p ~/.ssh
echo "${{ secrets.SSH_PRIVATE_KEY }}" > ~/.ssh/XYZ.pem
chmod 600 ~/.ssh/XYZ.pem
# Create an SSH directory, add the private SSH key, and set permissions.
- name: Set up Python
uses: actions/setup-python@v4
with:
python-version: '3.9'
# Set up Python 3.9 environment for running Python-based tasks.
- name: Set up Node.js
uses: actions/setup-node@v3
with:
node-version: '14'
# Set up Node.js 14 environment for running Node.js-based tasks.
- name: Install project dependencies
run: npm install
working-directory: .
# Install Node.js project dependencies specified in `package.json`.
- name: Install Pulumi
run: npm install -g pulumi
# Install the Pulumi CLI globally.
- name: Install dependencies
run: |
python -m pip install --upgrade pip
pip install -r requirements.txt
working-directory: .
# Upgrade pip and install Python dependencies from `requirements.txt`.
- name: Login to Pulumi
run: pulumi login
env:
PULUMI_ACCESS_TOKEN: ${{ secrets.PULUMI_ACCESS_TOKEN }}
# Log in to Pulumi using the access token stored in secrets.
- name: Set Pulumi configuration for tests
run: pulumi config set aws:region eu-central-1 --stack dev
# Set Pulumi configuration to specify AWS region for the `dev` stack.
- name: Pulumi stack select
run: pulumi stack select dev
working-directory: .
# Select the `dev` stack for Pulumi operations.
- name: Run tests
run: |
pulumi config set aws:region eu-central-1
pytest
working-directory: .
# Set AWS region configuration and run tests using pytest.
- name: Preview Pulumi changes
run: pulumi preview --stack dev
working-directory: .
# Preview the changes that Pulumi will apply to the `dev` stack.
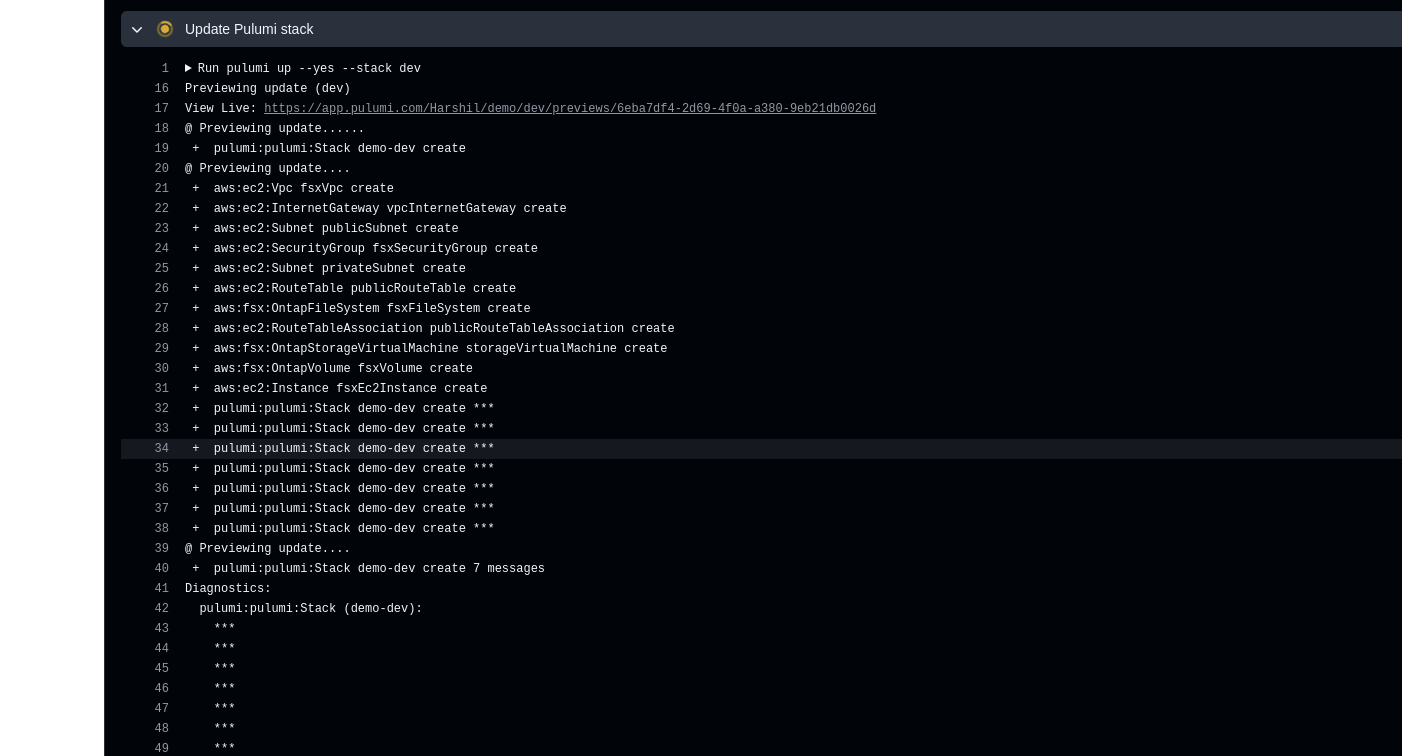
- name: Update Pulumi stack
run: pulumi up --yes --stack dev
working-directory: .
# Apply the changes to the `dev` stack with Pulumi.
- name: Pulumi stack output
run: pulumi stack output
working-directory: .
# Retrieve and display outputs from the Pulumi stack.
- name: Cleanup Pulumi stack
run: pulumi destroy --yes --stack dev
working-directory: .
# Destroy the `dev` stack to clean up resources.
- name: Pulumi stack output (after destroy)
run: pulumi stack output
working-directory: .
# Retrieve and display outputs from the Pulumi stack after destruction.
- name: Logout from Pulumi
run: pulumi logout
# Log out from the Pulumi session.Output:
About the author
credativ Redaktion
about the person
This account serves as a hub for the valuable contributions of former credativ employees. We would like to thank them for their great content, which has enriched the technical knowledge on our blog over the years. Their articles remain accessible to our readers here.