How and when to use Software-Defined Networks in Proxmox VE
| Categories: | credativ® Inside |
|---|---|
| Tags: | anleitung howto proxmox sdn software defined network software defined networking |
How and when to use Software-Defined Networks in Proxmox VE
What is Software-Defined Networking?
How to configure a SDN
Knowing the basics and possibilities of Software-Defined Networking (SDN) now, it gets interesting to set up such a network within a Proxmox cluster.
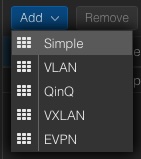
Proxmox comes with support for software-defined networking (SDN), allowing users to integrate various types of network configurations to suit their specific networking needs. With Proxmox, you have the flexibility to select from several SDN types, including “Simple”, which is likely aimed at straightforward networking setups without the need for advanced features. For environments requiring network segmentation, VLAN support is available, providing the means to isolate and manage traffic within distinct virtual LANs. More complex scenarios might benefit from QinQ support, which allows multiple VLAN tags on a single interface. Also and very interesting for data centers, Proxmox also includes VxLAN support, which extends layer 2 networking over a layer 3 infrastructure which significantly increases the number of possible VLANs which would else be limited to 4096 VLANs. Lastly to mention is the EVPN support which is also part of Proxmox’s SDN offerings, facilitating advanced layer 2 and layer 3 virtualization and providing a scalable control plane with BGP (Border Gateway Protocol) for multi-tenancy environments.
In this guide, we’ll walk through the process of setting up a streamlined Software-Defined Network (SDN) within a Proxmox Cluster environment. The primary goal is to establish a new network, including its own network configuration that is automatically propagated across all nodes within the cluster. This newly created network will created by its own IP space where virtual machines (VMs) receiving their IP addresses dynamically via DHCP. This setup eliminates the need for manual IP forwarding or Network Address Translation (NAT) on the host machines. An additional advantage of this configuration is the consistency it offers; the gateway for the VMs will always remain constant regardless of the specific host node they are operating on.
Configuration
The configuration of Software-Defined Networking (SDN) got very easy within the latest Proxmox VE versions where the whole process can be done in the Proxmox web UI. Therefore, we just connect to the Proxmox management web interface which typically reachable at:
- https://HOSTNAME:8006

–> Datacenter
—-> SDN
——–> Zones
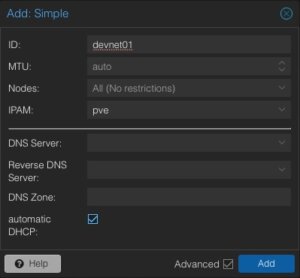
The menu on the right site offers to add a new zone where the new zone of the type Simple will be selected. A new windows pops up where we directly activate the advanced options at the bottom. Afterwards, further required details will be provided.

ID: devnet01
MTU: Auto
Nodes: All
IPAM: pve
Automatic DHCP: Activate
The ID represents the unique identifier of this zone. It might make sense to give it a recognisable name. Usually, we do not need to adjust the MTU size for this kind of default setups. However, there may always be some corner cases. In the node sections, this zone can be assigned to specific nodes or simply to all ones. There may also be scenarios where zones might only be limited to specific nodes. According to our advanced options, further details like DNS server and also the forward- & reverse zones can be defined. For this basic setup, this will not be used but the automatic DHCP option must be activated.
Now, the next steps will be done in the chapter VNets where the previously created zone will be linked to a virtual network. In the same step we will also provide additional network information like the network range etc.

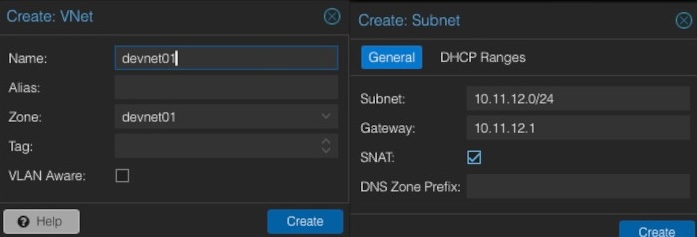
When creating a new VNet, an identifier or name must be given. It often makes sense to align the virtual network name to the previously generated zone name. In this example, the same names will be used. Optionally, an alias can be defined. The important part is to select the desired zone that should be used (e.g., devnet01). After creating the new VNet, we have the possibility to create a new subnet in the same window by clicking on the Create Subnet button.
Within this dialog, some basic network information will be entered. In general, we need to provide the desired subnet in CIDR notation (e.g., 10.11.12.0/24). Defining the IP address for the gateway is also possible. In this example the gateway will be placed on the IP address 10.11.12.1. Important is to activate the option SNAT. SNAT (Source Network Address Translation) is a technique to modify the source IP address of outgoing network traffic to appear as though it originates from a different IP address, which is usually the IP address of the router or firewall. This method is commonly employed to allow multiple devices on a private network to access external networks.
After creating and linking the zone, VNet and the subnet, the configuration can simply be applied on the web interface by clicking on the apply button. The configuration will now be synced to the desired nodes (in our example all ones).
Usage

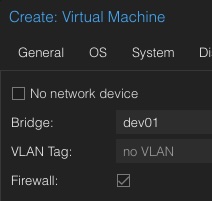
When it comes to DevOps and automation, this is also available in the API where virtual machines can be assigned to the new network. Such a task could look like in the following example in Ansible:
 - name: Create Container in Custom Network
 community.general.proxmox:
 vmid: 100
 node: de01-dus01-node03
 api_user: root@pam
 api_password: {{ api_password }}
 api_host: de01-dus01-node01
 password: {{ container_password }}
 hostname: {{ container_fqdn }}
 ostemplate: 'local:vztmpl/debian-12-x86_64.tar.gz'
 netif: '{"net0":"name=eth0,ip=dhcp,ip6=dhcp,bridge=devnet01"}'
Virtual machines assigned to this network will immediately get IP addresses within our previously defined network 10.11.12.0/24 and can access the internet without any further needs. VMs may also moved across nodes in the cluster without any needs to adjust the gateway, even a node get shut down or rebooted for maintenances.
Conclusion
In conclusion, the integration of Software-Defined Networking (SDN) into Proxmox VE represents a huge benefit from a technical, but also from a user perspective where this feature is also usable from the Proxmox’s web ui. This ease of configuration empowers even those with limited networking experience to set up and manage even more complex network setups as well.
Proxmox makes it also easier with simple SDNs to create basic networks that let virtual machines connect to the internet. You don’t have to deal with complicated settings or gateways on the main nodes. This makes it quicker to get virtual setups up and running and lowers the chance of making mistakes that could lead to security problems.
For people just starting out, Proxmox has a user friendly website that makes it easy to set up and control networks. This is really helpful because it means they don’t have to learn a lot of complicated stuff to get started. Instead, they can spend more time working with their virtual computers and not worry too much about how to connect everything.
People who know more about technology will like how Proxmox lets them set up complex networks. This is good for large scaled setups because it can make the network run better, handle more traffic, and keep different parts of the network separate from each other.
Just like other useful integrations (e.g. Ceph), also the SDN integration provides huge benefits to its user base and shows the ongoing integration of useful tooling in Proxmox.
| Categories: | credativ® Inside |
|---|---|
| Tags: | anleitung howto proxmox sdn software defined network software defined networking |
About the author
gyptazy
Senior DevOps Consultant
zur Person
In my tech repertoire, FreeBSD and federated services stand not just as a personal preference but as a symbol of a commitment to the ethos of open-source. I am a fervent believer in the symbiotic relationship between developers including DevOps, SysOps and the open source community. As I continue to lead teams in the ever-evolving landscape of technology, their dedication to open-source contributions and advocacy for decentralized and federated services echoes not only in the code they write but in the ethos they instill within the teams.

