NetApp Storage and NVMe-oF for Breakthrough Performance in Proxmox Virtualization Environments
| Tags: | howto proxmox Virtualisierung |
|---|
NetApp Storage and NVMe-oF for Breakthrough Performance in Proxmox Virtualization Environments
What is NVMe-oF
NVMe over Fabrics (NVMe-oF) is a cutting-edge protocol that has been developed to bring the impressive performance and low-latency characteristics of NVMe storage devices over network fabrics. This innovation is particularly transformative for data centers, as it facilitates the separation of storage and compute resources, granting administrators the ability to deploy these resources more flexibly and with greater scalability which makes it perfectly fine for virtualization workloads.
NVMe-oF is versatile in its support for multiple transport layers where it can operate over Fibre Channel (FC), Ethernet with the TCP/IP protocol with RDMA capabilities through RoCE or iWARP, and even utilize InfiniBand, each offering unique performance features tailored to different deployment needs.
NVMe-oF via TCP
When NVMe-oF is deployed over Ethernet with TCP, it brings the benefits of NVMe storage to the broadest possible range of environments without the need for specialized network infrastructure like Fibre Channel or InfiniBand. This brings access to high-performance storage by utilizing the common and familiar TCP stack, significantly reducing complexity and cost. The adoption of NVMe-oF with TCP is further facilitated by the widespread availability of Ethernet and expertise, making it a compelling choice for organizations looking to upgrade their storage networks without a complete overhaul.
The protocol’s efficiency is well maintained even over TCP, allowing NVMe commands to be passed with minimal overhead, thus keeping latency at bay, which is critical for latency-sensitive applications like virtualized data servers.
Configuring NetApp Storage
General
The guide presumes that users have already established the foundational storage setup, including the configuration of Storage Virtual Machines (SVMs). It highlights that the administration of these systems is relatively straightforward, thanks to the intuitive web interface provided by NetApp storage systems. Users can expect a user-friendly experience when managing their storage solutions, as the web interface is designed to simplify complex tasks. This also includes the whole setup for NVMe-oF storage, which requires to enable NVMe in general on the SVM, setting up the NVMe namespace and the NVMe subsystem.
Note: All changes can of course also be performed in an automated way by orchestrating the OnTap API.
Enable NVMe on SVM
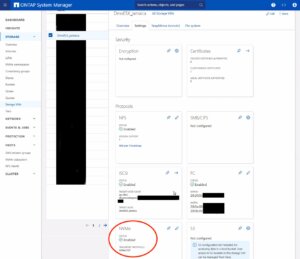 To enable NVMe at the SVM level on a NetApp storage system, this can typically be done by following these summarized steps, which can be accessed through the system’s web interface. Simply navigate to the Storage menu, then to Storage VMs, and finally selecting the specific SVM name you wish to configure:
- Configure NVMe Protocol: Within the SVM settings, look for a section or tab related to protocols. Locate the NVMe option and enable it. This might involve checking a box or switching a toggle to the ‘on’ position.
- Save and Apply Changes: After enabling NVMe, ensure to save the changes. There might be additional prompts or steps to confirm the changes, depending on the specific NetApp system and its version.
Remember to check for any prerequisites or additional configuration settings that might be required for NVMe operation, such as network settings, licensing, or compatible hardware checks. The exact steps may vary slightly depending on the version of ONTAP or the specific NetApp model you are using. Always refer to the latest official NetApp documentation or support resources for the most accurate guidance.
Creating the NVMe Subsystem
Afterwards, a new NVMe subsystem can be created on the NetApp storage system. This can be done by selecting the Hosts section, and choosing NVMe Subsystem to start the process of adding a new subsystem. A new wizard opens up which requires additional information regarding the newly to be created subsystem:
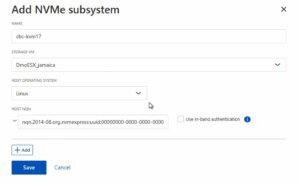 Name: <An identifier of the NVMe subsystem>
Storage VM: <The previously adjusted SVM>
Host Operating System: Linux (important for the block size)
Host NQN: <NQN of the Proxmox VE node>
It’s essential to ensure that all information, especially the Hosts NQN, is correctly entered to avoid connectivity issues. Additionally, consult the official NetApp documentation for any version-specific instructions or additional configuration steps that may be required.
Creating the NVMe Namespace
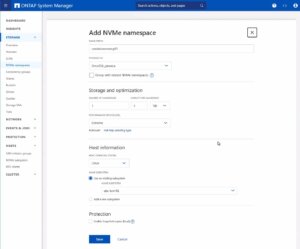 As a last step the NVMe namespace must be created. To add an NVMe namespace on a NetApp storage system, you would begin by logging into the web interface and navigating to the Storage section, followed by selecting NVMe Namespaces. In this area, you initiate the process of creating a new namespace. You will be prompted to provide specific details for the namespace, such as its name, size, and the associated SVM that will manage it.
Note: Also take an important note about the Performance Service Level which might be switched to a custom profile to avoid any limitations.
Once you have entered all the necessary information, you will typically proceed to choose the performance characteristics, like the service level or tiering policy, depending on your performance needs and the capabilities of your NetApp system.
After configuring these settings, you need to review your choices and save the new namespace configuration to make it available for use. It is important to ensure that the namespace is properly configured to match the requirements of your environment for optimal performance and compatibility. Always check for any additional steps or prerequisites by consulting the NetApp documentation relevant to your ONTAP version or storage model.
The configuration on the storage part is now complete. The next steps will be performed on the Proxmox VE node(s).
Configuring Proxmox Node
General
After configuring the NetApp storage appliance, all Proxmox VE nodes within the cluster must be configured to use and access the NVMe-oF storage. Unfortunately, Proxmox VE does not support this type of storage out of the box. Therefore, this cannot be easily configured by the Proxmox web interface. Luckily, Proxmox VE is based on Debian Linux from where all needed dependencies and configurations can be obtained but it requires us to do everything on the command line (CLI). Depending on the amount of nodes within the cluster, further config management tools like Ansible may boost up the initial setup process and make it repeatable for new potential nodes in the future. We may also assist you by setting up custom config management environments fitting your needs.
In general, this process consists of:
- Installing needed packages.
- Enabling the Kernel modules.
- Discovery of the storage.
- Connecting with the storage.
- Creating a LVM Volume Group.
- Assigning the storage in the Proxmox web interface.
The next steps in this blog post will cover the process in detail and guide you through the needed steps on the Proxmox VE nodes which must be done on the command line.
Installing Needed Packages
Using and accessing NVMe-oF requires the related user land tools (nvme-cli) to be present on the Proxmox VE node. Debian Linux already provides those tools within the Debian repository. As a result, the overall installation process is very easy. The package can simply be installed by the following command:
apt-get install nvme-cli
This package also already provides the required Kernel module which can simply be loaded by running:
modprobe nvme_tcp
Afterwards, the module should be added to be loaded at boot time:
echo "nvme_tcp" > /etc/modules-load.d/20-nvme_tcp.conf
After these steps, a connection with the storage can be initialized.
Connecting With the Storage
Interacting with the NetApp storage and its NVMe-oF functionality is a multi-step process and requires us to exchange the NVMe Qualified Name (NQN) address of each Proxmox VE node accessing the NVMe storage. The NQN address of a Proxmox VE node can be obtained by running the command:
cat /etc/nvme/hostnqn
![]()
Add the host NQN address on your NetApp export to allow the nodes accessing it. An example output is given in the screenshot.
Discovery & Connecting
In the next step, the NVMe’s will be discovered and connected to the Proxmox VE node. The discovery and connect process is simply done by running the following commands:
nvme discover -t tcp -a 192.168.164.100 -s 4420

nvme connect -t tcp -n na01-nqn01 -a 192.168.164.100 -s 4420
To make this configuration persistent to system reboots, the commands will also be added to the nvme discovery file. The nvmf-autoconnect systemd unit file ensures to load this. Therefore, this systemd unit file must also be enabled.
echo "discover -t tcp -a 192.168.164.100 -s 4420" >> etc/nvme/discovery.conf

systemctl enable nvmf-autoconnect.service
Volume Group
The last steps will partially be done on the command line and on the Proxmox web interface to add the new storage to the cluster.
Important:
This steps must only be done on a single Proxmox VE host node and not on all ones. The integration happens on cluster level and implies all Proxmox VE nodes once this has been done.
The last command on the command line results in creating a new LVM Volume Group (VG) on the new NVMe device which can simply be done by executing the command:
vgcreate shared_nvme01 /dev/nvme0n1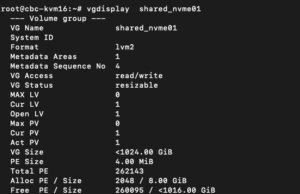
The newly created LVM Volume Group (VG) can be validated by running the command:
vgdisplay shared_nvme01
An output like in the given screenshot should be returned, including all further details of this VG. After validating the information, all tasks are completed on the command line.
To finally use this LVM Volume Group on all Proxmox VE nodes within the cluster, this Volume Group must be added and integrated on cluster level. Therefore, we need to login to the web frontend of the cluster and add this under:
- Datacenter
- Storage
- Add
- LVM
In the new window some more details for the new LVM storage have to be defined:
- ID: shared_nvme01 (this can be any text and is jut an identifier)
- Base storage: Existing volume groups
- Volume group: shared_nvme01
- Content: Disk image, Container (may vary)
- Nodes: <Select all nodes that should use it>
- Enables: Yes
- Shared: Yes
- Wipe Removed Volumes: No

By pressing on Add this will be attached to the selected nodes as a new volume and can directly be used.
Conclusion
The utilization of NVMe over Fabrics (NVMe-oF) via TCP in addition with Proxmox VE in a virtualization environment presents a compelling solution for organizations looking at cost-effective yet high-performance storage architectures. This approach leverages the widespread availability and compatibility of Ethernet-based networks, avoiding the need for specialized hardware such as Fibre Channel or InfiniBand, which can be cost-prohibitive for many enterprises.
By integrating NVMe-oF with Proxmox, a popular open-source virtualization platform, users can benefit from significantly improved data transfer speeds and lower latency compared to traditional storage solutions. NVMe-oF may not only be used with Proxmox VE but also on other operating systems like FreeBSD and hypervisors like bhyve. This provides a great benefit for latency-sensitive workloads, such as virtualized database servers, where rapid access to data is critical for performance. The NVMe protocol is designed to exploit the full potential of solid-state storage technologies. When used over a network fabric using TCP, it can deliver near-local NVMe performance by being very cost-effective.
At your convenience, we’re available to provide more insights into NetApp storage systems, covering both hardware and software aspects. Our expertise also extends to open-source products, especially in establishing virtualization environments using technologies like Proxmox and OpenShift or in maintaining them with config management. We invite you to reach out for any assistance you require.
You might also be interested in learning how to migrate VMs from VMware ESXi to Proxmox VE or how to include the Proxmox Backup Server into your infrastructure.
| Tags: | howto proxmox Virtualisierung |
|---|

About the author
gyptazy
Senior DevOps Consultant
zur Person
In my tech repertoire, FreeBSD and federated services stand not just as a personal preference but as a symbol of a commitment to the ethos of open-source. I am a fervent believer in the symbiotic relationship between developers including DevOps, SysOps and the open source community. As I continue to lead teams in the ever-evolving landscape of technology, their dedication to open-source contributions and advocacy for decentralized and federated services echoes not only in the code they write but in the ethos they instill within the teams.